Category Archives: Tutorials

I love you….this much card

Mothers Day Card

I love this one! I got this idea from here but I got my little one to write the words on so its more personal. You could make this for Fathers Day or Mothers Day or just any occasion to make another person smile.

This is so simple to make. You just need card, glue and a marker or felt tip. I used a sheet of scrapbook card because its bigger than A4 and its double-sided but you can use any card.

I love you card

Draw around your little ones hand, I drew around both and cut them out. Cut a strip as long as you can or you could stick two pieces together and fold it up. Ask your little one to write ‘This Much’ across the strip and ‘I love you’ on the front of one of the hands. Then just glue the strip to the hands (I matched up the thumbs so the pink was on the outside of both hands). You may have to cut across the bottom of the hands to make it stand up!

Mothers Day Card for kids

Its great isn’t it! I even found a pink envelope to put it in….hope Daddy doesn’t mind that!!

Fathers Day Card

Love Gem x

DIY Fathers Day Card

I really liked this idea from Martha Stewart but thought I’d make it something that the kids could get involved in for Fathers Day so used a plain tie that the kids could decorate 🙂

Children DIY Card

You will need A4 coloured card that you cut down the middle lengthways (you can make any sized cards though) and some white paper.

First take your coloured card and fold it in half – mine is around 11cm x 15cm once folded

DSC_0090

Then cut about an inch in from the top on both sides and fold in.

DSC_0092

Cut a tie shape ensuring it fits inside the shirt – you need the tip of the tie to line up on the bottom edge.

Shirt and Tie card

Now the fun part – your little one can decorate the tie however they wish – felt pens, paint, glitter, wool etc then stick it to the front of the card starting at the bottom so the bottom edge lines up, then add some small buttons on the lapels. Here are the ones we made when my neice and nephew came around.

Toddler Fathers Day Card

I really like how they can put their own style on to their card and they could even decorate the shirt too 🙂

Gem x

Roll Up Case

I’ve been trying to think of ways to keep our pen and pencil box tidy and this is it! Its simple – no need to hem as I used felt and you don’t even need to use a sewing machine -jump to the bottom to see how to make it using embroidery thread.

These would be great as gifts! Make them for other items too like paintbrushes or make-up brushes. They store neatly in the car or handbag too.

DSC_1377

Ingredients:

You will need 3 pieces of felt (skip to the case at the bottom to see 3 different colours)

Ribbon

I am making a case for 24 pens so I measured an inch for each pen then I added a further 1 inch overall (BUT in hindsight you don’t need to add a further inch – check out my hand sewn case at the bottom of the post, I didn’t bother adding a half inch to each side) I’m only mentioning it as you can see from the photo that there is a little extra and it might be confusing.

So you have your length of felt (24 or 25 inches)  then to get the correct width I measured my pen and added an inch. I cut two pieces like this and then one smaller width one, three quarters the length of the pen! Hope that makes sense!

So for my felt tip case I had 2 pieces = 25 inch x 7 inch and 1 piece = 25 inch x 4 inchDSC_1338


I cut my felt using pinking shears but that isn’t necessary – Take the thinner piece of felt and mark on a line every inch – I used a sewing pen that disappears after a couple of hours. If you are adding an inch like I did then start by marking a line half an inch in from the edge then every inch and then you will finish with a half inch in from the end.

DSC_1342


Now put the smaller lined felt on top of one of the bigger pieces lining up the bottom and sew up the lines, backstitching each end slightly to add stability.

DSC_1356


Put your last piece of felt down then add the two that are sewn up on top. Take the ribbon which needs to be about the same length as the felt and sandwich it between the two layers. This will give a wrap around fastening which is easy for my little ones to close. For a bow fastening just add two shorter lengths of ribbon – see the hand sewn roll up case for an example. Now just sew around all four edges about a quarter of an inch in from the edge making sure you catch the ribbon in.

DSC_1364


And you are done! Add the pens and roll up……….. the ribbon is just wrapped around and tucked in which is easy for little fingers.

DSC_0018DIY Roll up case


If you don’t have a sewing machine then you can hand sew using embroidery thread – it gives it a great look and older children could make it too for a lovely present. This is a smaller version especially for crayons but you can make the pockets as large or as small as you like! I still used an inch for each crayon and I used three different colours of felt. I made it the same way as the larger case, but I used pins to mark the lines on the pink felt, then sewed up the lines on to the green felt using embroidery thread, making sure any knots are on the back. I added two ribbons (each half the length of the case) on one side sandwiching them between the cream and the green felt and sewed up all four edges with the embroidery thread.

DSC_0055

DSC_0062

DSC_0041 DSC_0048

 
Gem x

Bunny Cup Gift

Easter Bunny Cup
I made these little bunny cups as an alternative to buying easter eggs for my nieces and nephews as they get enough. They are half filled with sweets, mini eggs and chocolate coins and they are pretty cute! They are very simple to make, and you don’t need to go by what I used to create them. They would look just as effective with – card, paper, funky foam, cotton wool balls, buttons, sticker dots….you can use whatever you have to hand and in whatever colours you like – WIN!


I used:

  • A silver party cup
  • Grey and pink felt for the ears
  • Pink and white pompoms
  • Stick on eyes
  • Sharpie pen for the whiskers
  • Pink tissue paper for inside

Easter Crafts
 

Take the cup and add a nose, ensure the seam of the cup is at the back to make it neater. I used a hot glue gun here as it’s quick but white gloopy glue would work fine.

Easter crafts


Add two pompoms just under the nose.


Easter Crafts


 Draw whiskers and a mouth.


Easter Crafts
 
Add eyes.
 
 
Doesn’t he look cute already!


Easter gift

Cut two bunny shaped ears in two different colours with one colour being smaller than the other.


Easter Crafts


Place the smaller one on top of the other and glue in place. If you are having two sticky up ears do this to both. If you are having one droopy ear then leave off the second smaller inner ear as in this photo.

Glue the ears on the inside of the front of the cup.


Easter Crafts


Add some glue to the tip of the ear with no inner piece and glue down to the side of the eye.

….I love him…..I’d be happy to receive this little dude!


Easter gitf ideas


Add some scrunched up tissue paper to the base to fill out some of the room in there.

Easter Crafts


Fill with goodies 🙂

Easter Gift Ideas


Make as many as you need. My little one decided we had to have some with two sticky up ears, all I need to do now is fill them all up and they are ready to go!

Gem x

Easy Felted Polystyrene Easter Eggs

Polystyrene easter eggsEaster is fast approaching and this year I have decided to decorate the house to give the girls a sense of excitement about Easter Sunday. I know these ‘believing’ years won’t last long so I want to make the most of every moment of wonder, for their sake as well as my own.

These are an adult only craft as the needle is extremely sharp.

Wool roving and polystyrene


To make these all you need is:

-Wool roving

-Polystyrene or Styrofoam eggs – any size

-A felting needle – I’d buy a couple as they can snap. It has to be a felting needle as it has tiny barbs on the point that helps to felt the wool so a normal needle can’t be used.

Wool Roving


To cut wool roving, the best way is to hold each end and pull gently…

Wool roving trimming


…..and the wool will naturally come apart. This gives it a feathery edge rather than a blunt thick edge which is more difficult to disguise and can look a bit lumpy.

making felted eggs


I start at the top of the egg so for this I pull out a strand of the wool roving.

making polystrene felted eggs felted easter eggs felted easter egg


Start to coil the end of the roving up.


Make it a bit loose as the felting process will cover up the gaps.


This is for the top of the egg. If you need to make it bigger then just add another strand at the end of the last one and continue to coil, it will naturally stay together.

needle felting sytrofoam


Add it to the top of the egg, take your needle and stab downwards in a straight line. This will anchor the roving in to the egg. Keep stabbing the roving all over until it is stuck down. You can be quite hard and fast here but take care of your fingers and keep them out of the way of the needle.

Eatser craft Easter Crafts felting eggs


Here, I am adding stripes – take a strand of roving in the colour of your choice and lay it across the egg.


Hold it fairly taut and stab in to position all the way around. The left over end bit you can either tease out (if its long) and then stab down or just stab down overlapping the ends as it should be quite thin and won’t show.


To make the lines really straight, go around the edge and gently push in any strands that are wobbly.

Easter decorations

Stripy easter egg


Keep going in the colours you like, bigger stripes take less time.


Once you get to the bottom, make another coil and felt it down in the same way.


I like to give it a final stab all over with the needle and then make loads more in all different sizes 🙂

easter egg ideas easter egg ideas Easter craft


To make one colour, I take a thicker strand and stab in to place


Keep going in sections like this as it gives it a neater appearance rather than wrapping the roving in one big piece around the whole egg.


Make coils for the top and bottom as before. To add spots just make very small coils and felt them on.

Easter decorations


I’ve added mine to a basket but you could add a ribbon to the top and hang them.


Gem x

Simple Coloured Rice for Sensory Play

Sensory Play
I’ve been wanting to make this coloured rice for ages, actually, since the girls have been asking for their sand pit which is currently outside, soggy, smelly and not to mention the ridiculous changeability of our weather – Its March yet its snowing outside!

This is a great alternative that can be used indoors…if you don’t mind hoovering up a bit afterwards.

I have been wanting to experiment a bit with it as I had read a recipe for adding rubbing alcohol which I really don’t like the thought of for small children to be handling or the smell!

For me doing anything like this for the kids has to be simple so here’s my recipe!


You will need:

  • Cheap basic rice – I got mine from a Cash and Carry (5kg and used about half in all)
  • Food colouring
  • Zip loc bags (makes it easier but sandwich bags or a bowl would do it)

Optional Extras:

  • White Vinegar (instead of rubbing alcohol) – personally I wouldn’t bother using either.
  • Water – a few drops to help mix the colour if it seeems a bit thick

    See the bottom of post for why I would choose not to use these things.

Toddler play


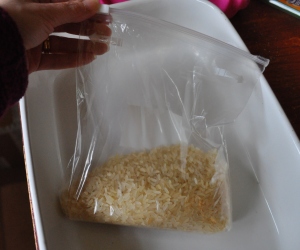
Add the amount of rice you want to colour to the bag

Toddler Play


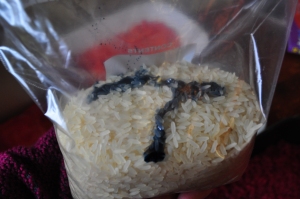
 Add the food colouring – don’t be shy here…. try a few blobs and add more if necessary. The more you add the more vibrant it will be.

Toddler Activities


Close the bag up and massage the rice inside so its all covered. This is where the Zip Loc comes in handy as I kept adding dye until it looked really vibrant!

Make whatever colours float your boat, even just one colour looks good to a child.

Sensory Play
 
 
Transfer them to a dish so the rice can dry overnight (baking trays covered in foil would also be good here) I actually couldn’t wait so after a while I put them in the oven on really low for 10 mins giving it a stir half way to help it along. I still left them in their trays overnight though as the rice was hot and it was nearly bedtime anyway.

 
Then when its all dry put it in a container with enough room so the kids can play – I used a Really Useful Box for wrapping paper but any large plastic tub would work.

Toddler play

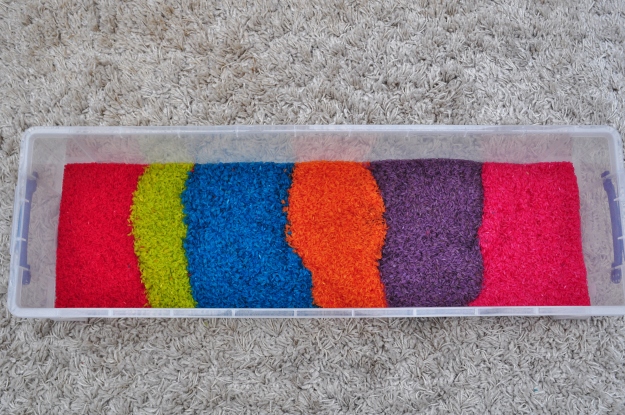
How AMAZING does that look!

Toddler Games

Coloured Rice
 
 
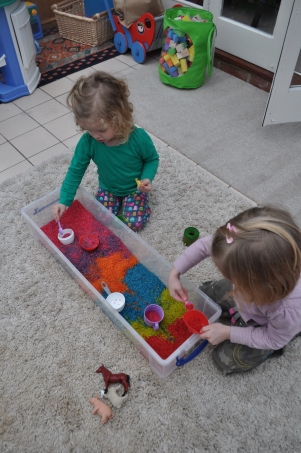
The Girls LOVED it! They played for ages and made up all different kinds of games. It did make me think it would be great outside when it’s warmer too ……


as it didn’t take me long to realise that I should put a mat down ……………………


Toddler play
 
Like so ….. because it made it so much easier to clear up!

One of the games we played was hiding treasure. I found really small objects like a hair clip or a small image I had cut out of a card and hid them in the rice and they had to find them. That then gave me all sorts of ideas like hiding buttons and asking them to find the right coloured one – a bit like button bingo! We played for ages just sprinkling it on our hands because it felt nice, a bit like sand in a way.

I reckon it will last months before dirt and grime will mean I need to replace it! I have a lid for the box so that will make it easy to store away too.
 

Coloured Rice
 
 
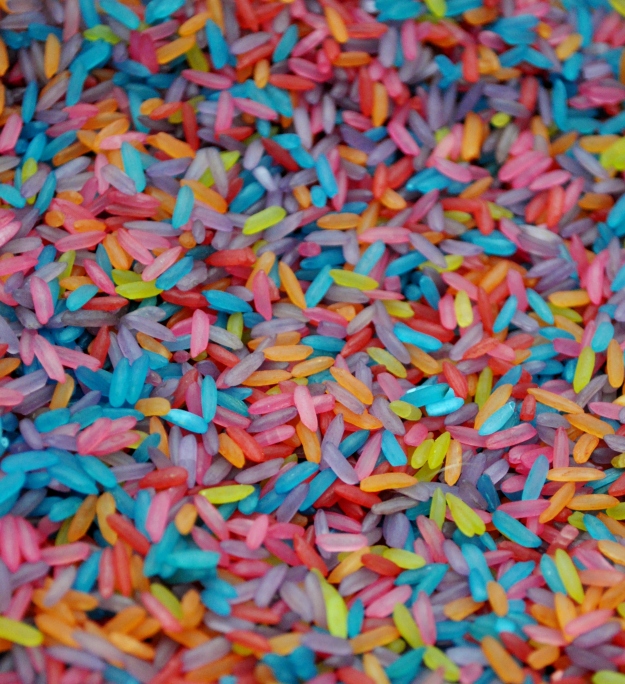
By the end it had all mixed up in to this fantastic rainbow coloured rice!


Why I chose not to add anything else to the recipe!

I believe using Rubbing alcohol or the safer alternative- White Vinegar makes the colour less likely to come off. However, I found just using the food colouring, that once the rice was dry it didn’t come off anyway. I added vinegar to the blue one to test it and to be honest it made it smell….very vinegary which wasn’t very nice!

I tested it by putting some blue rice in to a bowl of water and a very faint amount of dye came off as opposed to when I put the red rice in a bowl of water more came off (not majorly but thought i’d point that out). So I would suggest if you think your little one is likely to empty their drink in it then throw the rice at the walls or maybe get really sweaty hands it may be worth using white vinegar. I’ve told my kids they mustn’t get it wet (just in case) and I will supervise them when they are playing with it anyway but it really doesn’t worry me. If you do want to use vinegar add it when you add the colouring about a tablespoon to a large cup of rice.

If you use any drops of water, it will make the rice wetter and will take longer to dry so use sparingly. My orange and green had water in them and I can’t say they were any better than the rice with nothing added (Red, Pink, Purple)

Hope you have fun, its great fun making it as well as playing with it!

Toddler Tissue Paper Heart

Its all about the children this week as we have a few days off work but we are all ill so we’re mostly stuck inside. I put together this quick craft idea so my youngest could easily create something with no mess……..well…very little mess…. there’s always ‘some’ mess 🙂

You’ll need:

  • Paper – any colour I used black and it was A4 size
  • Tissue paper – a selection of colours is nice
  • Sticky back plastic/book covering film A4 size to match paper

Valentine craft
 
I drew a heart on some black paper and then another one about a centimetre in from the first and cut them both out to make a heart with a hole if that makes sense!

I chose a heart just because its nearly Valentine’s and I love ’em but you could do any shape you wish!


Heart in Fablon

Next I peeled the backing off the book covering film, stuck the heart on then put the backing back over the top so I could smooth it all out.


Peeling off the backing

With the backing still on, I cut out the heart, then peeled it off.


Toddler crafts

You will be left with a heart that has one sticky side.

….I really didn’t need this many photo’s to explain that I am sure….

anyway……….


toddler tissue paper heart

…on to the fun bit. Rip up or cut shapes out of tissue paper and let your little one stick them on the shape, wherever they want, however they want, just encourage them to keep them flat as much as possible.


Toddler Heart Craft

The stickiness of the plastic just makes it so simple, in fact we used book covering film and she could re-position the tissue paper if she wanted which was great. It was old though so that may be why!

Toddler Crafts


Once it was all covered, she proudly stuck it on our window with a mini couple of blobs of blue tack.

Its really cute and effective and I think we should make more and have a full stained glass window effect 🙂

I think it would be useful to make a few shapes up but leave the backing on with some tissue paper in a sandwich bag so if you need something to keep the little one busy, you can grab one quick and off they go.

Gem x

Handprint Heart Tree

We thought we would make my dad a picture who is in hospital at the moment. This handprint heart tree is really simple and quick and would be great for any occassion where toddler input is needed, like Mothers Day, Fathers Day or Valentines Day!

Painted hand
 
All you need is a toilet roll and some paint.

First I painted my littles ones hand and arm and pressed it on to the paper. I filled in any spaces that didn’t take with the paint to make it look like a tree trunk and branches.


Printing with a toilet roll


Then I pressed the toilet roll in to a heart shape. This will be the stamp to make heart shaped leaves.


Handprint Heart Tree
 
 
Press the end of the toilet roll in to red or pink paint and print all over the tree to create the leaves. I put the paint on a plate to make this easier for the girls to do.


Toddler Valentine Craft


A few green fingerprints later for grass and Grandads picture is done!
 
I think this would look good with hearts cut out of pink, red or even green paper, then the child can just stick them on instead of using the toilet roll.

Gem x

Calming Glitter Jar

Calm Jar

Today we made a calming jar especially for those occasions when your child or even ‘you’ are feeling a bit stressed or upset and need to take a few minutes to calm down. You just shake it up and watch as the glitter swirls around and falls gently to the bottom.

If my girls get upset or have an outburst I’ve been teaching them to take a few deep breaths and I count with them and by the time I get to 5 they have generally calmed down at least enough to tell me what the problem is so this really is another way of doing that but so much prettier.


It’s really simple to make, all you need is

  • A screw top jar
  • 1-2 tablespoons of glitter glue
  • 3-4 teaspoons of glitter
  • Fairly warm water
  • Optional Extra: A drop of food colouring

Making a Calming Jar

Just fill the jar with the hot water leaving a small gap at the top for shaking room. (If using a plastic jar be careful the water isn’t so hot that it warps the jar)

Add the glitter glue and stir, stir, stir. The hot water will break up the glue and this is what will make the glitter move slower.


Calming Jar


Add the glitter and screw on the lid tight! Do not use a jar with a push on lid – I tried that the first time and it fell off mid shake even with my hands over it….I really needed to use the calming jar at that point!


Using the calming jar

This is my first one ………

Calming Jar

Then I added a drop of food colouring and swapped the jar!

The food colouring makes it really vibrant and I think the blue is really quite calming.


The amounts of glitter/glue you will need will vary depending on the size of the jar just don’t put too much glitter glue in or it will be too slow-moving and if you do then maybe add some bigger sized glitter that will fall quicker. I used very fine glitter and it takes a good few minutes to settle. Either way you can add more of each until it looks about right.


Some people use these as a Time Out aid so when the glitter has settled the child can join back in. I would probably avoid giving the jar to a tantruming toddler who may throw it; a plastic jar maybe safer for younger children. You could also use it for anxiety to take their mind off a problem for a moment or these can be used for adults if they are seriously stressed out and need to calm their thoughts.

These are great fun to make and brought up a discussion on feelings and why its good to take a few minutes to collect our thoughts. The funny thing was after we made it, I then had a particularly stressful couple hours dealing with work on my day off and my eldest who is 4 just said to me ‘mummy I think you need calming down’ and handed me the jar 🙂

Ribbon & Light Garland

Ribbon Garland

 
One of the things I love about Christmas is the glow of lights especially with the dark and cold of our british winter so any excuse to use them!

Ribbon Garland


 This is so simple a child could do it!

I just cut each ribbon 8 inches long and tied it to the set of lights with a simple knot.

I used battery operated lights so I could hide the battery box and not have wires trailing to the plug socket.


Ribbon garland


I used all sorts of ribbon scraps. I wanted to have a red and white theme so I bought some ribbons specifically and used some I already had. It needed a bit of bulking out so I cut up some strips of felt to make it fuller.

Ribbon and Light Garland


It really cheers up our fireplace and I think would look good in any colour combination for any occasion.